End-To-End 数据转换指南:使用 dbt-vertica Adapter 进行数据分析
编译:JiangChong
本视频介绍了使用开源 dbt-vertica-adapter 集成 dbt 和 Vertica 的方案。观看YouTube视频以了解如何直接在 Vertica 中快速转换原始数据,并利用 adapter 中的新功能。
dbt(Data Build Tool)是一款数据转换工具,可将原始数据高效地转换为经过清洗、易于查询并可供分析的精选数据集。在 dbt 中,数据转换和业务逻辑通过 SQL 语句和 Jinja 语言来表达。Jinja 将 dbt 变成了一个 SQL 编程环境。
您可以使用 dbt 和 OpenText Vertica 构建强大且高效的数据转换管道。dbt 代码在数据库内部执行,充分利用 Vertica 的高性能。此外,dbt 提供了软件开发最佳实践,如版本控制、内置测试框架、文档和代码可重用性,使 SQL 开发人员能够像软件工程师一样工作。
Vertica 的 dbt adapter 实现了从 dbt 到 Vertica 的连接。dbt-vertica 是一个开源项目,可在 Vertica 的 GitHub 仓库中获取。它使用 Python 和 yml 编写,并采用 vertica-python 驱动程序。
Vertica + dbt 数据栈
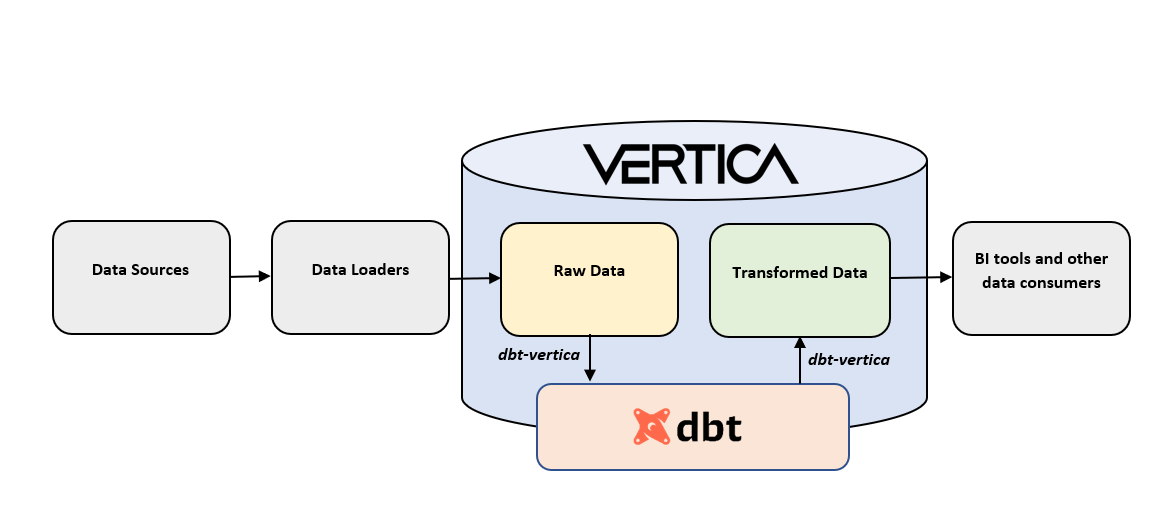
以下是 dbt 和 Vertica 数据栈的示意图。dbt 转换已经加载到 Vertica 中的数据,并使用 dbt-vertica adapter 连接到您的数据库。与传统数据转换工具不同,dbt 的数据转换直接在您的数据库中执行。没有任何数据会移出 Vertica。转换后的数据可供 BI 工具和其他技术用于进一步分析。
解决方案概述
本文档提供了一个使用 VMart 的数据转换管道示例,并包含配置环境以及使用 dbt-vertica adapter 连接 Vertica 的步骤。
本文档介绍的解决方案分为以下章节:
- 适用范围
- 环境
- 配置环境以将 dbt 与 Vertica 结合使用
- 配置 dbt Profile 以连接到 Vertica
- 使用 VMart 的数据转换管道示例
- 总结与结论
在阅读本指南时,您可以展开和折叠主题以查看更详细的说明。
适用范围
本文档要求并假定读者熟悉 dbt-core、Vertica、SQL、Jinja 和 VS Code。
本文档不涉及以下内容:
- Vertica 和 VMart 数据库的安装。
- 数据加载:将原始数据加载到 Vertica 的过程。
- 数据可视化:展示转换后数据的步骤。
- dbt Cloud。
环境
以下是我们在本文档中执行示例所使用的环境:
说明: 安装 dbt-vertica adapter 时会自动安装 dbt-core 和 vertica-python。
Vertica 环境:
- Vertica Analytic Database 23.3.0,安装在 3 节点 Linux VM 集群上。
- VMart 示例数据库
Windows 上的 dbt 环境:
- Visual Studio Code(VS Code)版本 1.76.2
- git 版本 2.40.0
- Python 版本 3.11.2
- dbt-vertica adapter 版本 1.5.0
- vertica-python 驱动程序版本 1.3.1
- dbt-core 版本 1.5.0
可连接到数据库的 SQL 客户端:
- 在我们的测试中,我们使用了 DBVisualizer 版本 13.0.4 以用户友好的方式检查表或视图中的数据。
配置环境以将 dbt 与 Vertica 结合使用
本节说明如何安装 dbt-vertica adapter 并初始化 dbt 项目。该配置基于 Windows 环境。
前置条件
在开始之前,请确保已安装以下内容:
- Python
- git
说明: 建议使用 git 为您的 dbt 项目引入源代码控制。这是一项最佳实践。请确保将 git.exe 的路径添加到用户的 PATH 环境变量中。
- Visual Studio Code(VS Code)
- VS Code Python 扩展
安装 dbt-vertica adapter
按照以下步骤在 Windows 上安装 adapter:
- 打开 VS Code。
- 在屏幕顶部的 Terminal 菜单中,单击 New Terminal。
- 命令行界面(CLI)将打开。
- 创建并激活 Python 虚拟环境。
说明: 我们建议您在此隔离环境中安装 adapter 并创建 dbt 项目。
- 导航到您想要创建虚拟环境的文件夹,然后创建并激活您的环境:

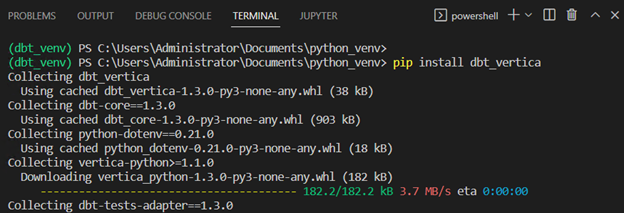
- 运行
pip install dbt-vertica来安装 adapter:
说明: 此操作将安装 dbt-core 和 vertica-python,您无需单独安装它们。
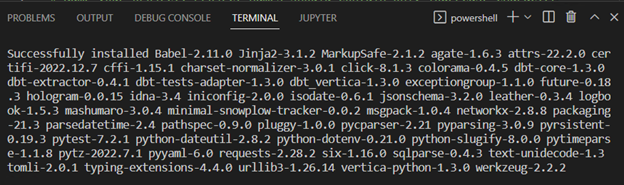
日志应以已安装的软件包列表结尾,如下所示:
初始化您的 dbt 项目
按照以下步骤初始化将托管您的转换模型的 dbt 项目:
- 创建一个文件夹来托管 dbt 项目,然后运行
dbt init命令在此位置创建项目。在 CLI 中输入所请求的信息:
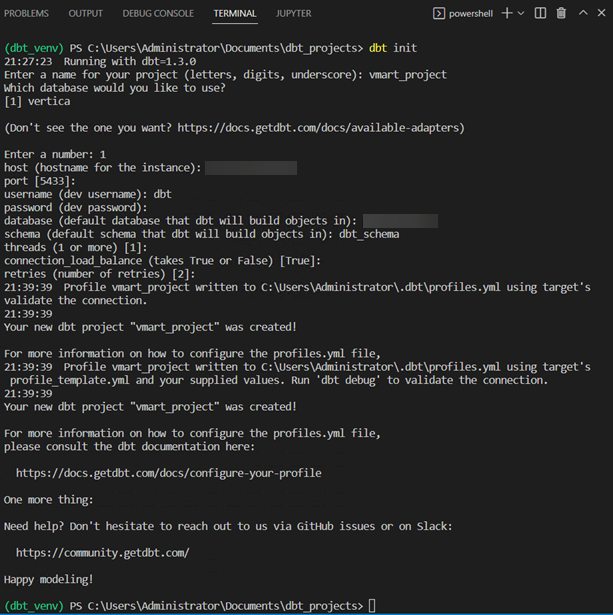
说明: 此操作将创建一个包含所有必要空文件夹的骨架项目。它还会创建可编辑以连接到 Vertica 的 profile 文件。dbt 项目文件
dbt_project.yml包含项目配置。
配置 dbt Profile 以连接到 Vertica
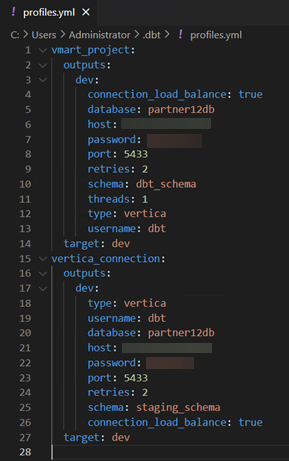
本节说明如何配置到 Vertica 的连接,也称为 dbt profile。当您按照上一节所述初始化项目时,dbt profiles 文件会自动生成。dbt profiles 文件位于以下目录:C:\Users\<my_user>\.dbt\profiles.yml。
指定到 Vertica 的连接
以下是 profiles 文件 profiles.yml 的示例。您可以编辑 profiles 文件并添加多个由唯一名称标识的连接。您在项目中使用的连接在项目配置文件 dbt_project.yml 中指定。
测试到 Vertica 的连接
执行 dbt debug 命令来测试您到 Vertica 的连接。此命令应在 Python 虚拟环境已激活且位于 dbt 项目文件夹内的情况下运行。
说明:
dbt debug检查 Python 和所有 .yml 文件是否已正确配置,以及 dbt 是否能够使用profiles.yml文件中提供的连接信息连接到 Vertica。
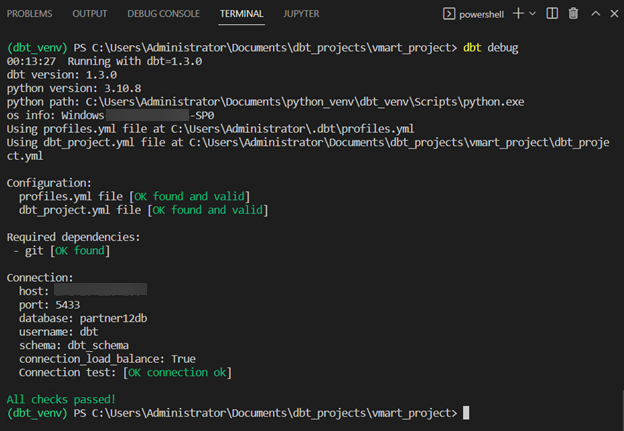
当所有测试都通过后,您就可以开始构建您的 dbt 模型了。
使用 VMart 的数据转换管道示例
以下解决方案包含一个数据转换管道,其目标是业务分析和报表。我们想要计算每个供应商的准时交货率、数量准确率和完美订单率。我们将此最终模型称为 vendor_performance。我们将展示 vendor_performance 模型如何通过一系列从原始数据开始的转换步骤来创建。
项目 Lineage 图
以下是该解决方案的 Lineage 图。它展示了从源数据到最终模型的数据流:
- 绿色节点是我们在该项目中使用的源数据/原始数据。
- 第二层节点是引用源数据并对原始数据进行轻微转换的 staging 模型。
- 第三层节点是引用 staging 模型并应用业务逻辑进行转换的模型。此处是一个维度表和一个事实表。用户可以使用 BI 工具查询这些模型。
- 最后一个节点是最终模型,它同时使用事实表和维度表,并计算用于报表的供应商 KPI。

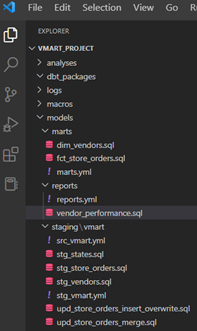
项目组织
项目通过以下文件夹结构进行组织:
- staging:包含引用原始数据表并对其进行轻微转换的模型。
- marts > vmart:包含引用 staging 模型并应用业务逻辑以进一步转换它们的模型。
- reports:包含最终用户可能查询用于分析的最终模型。
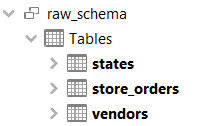
指定源数据
源数据是我们在项目中处理的原始数据。该项目的源文件是 models > staging > vmart > src_vmart.yml。此文件记录并指定以下原始表的测试:raw_schema.states、raw_schema.vendors 和 raw_schema.store_orders:
说明: 您可以使用 Vertica 的内置功能或各种辅助技术将源数据导入数据库。源数据以及 DDL 文件位于
demo_dbt_vmart/sampledata目录中。本项目使用的原始数据已加载到 Vertica 中。
models > staging > vmart > src_vmart.yml
version: 2
sources:
- name: raw_data
description: This is the raw data to transform.
database: partner12db
schema: raw_schema
tables:
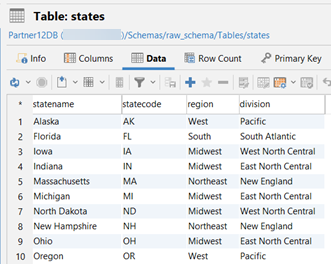
- name: states
description: This is the raw states data.
columns:
- name: statecode
description: The primary key for the raw states data.
tests:
- unique
- not_null
- name: vendors
description: This is the raw vendors data.
columns:
- name: vendorid
description: The primary key for the raw vendors data.
tests:
- unique
- not_null
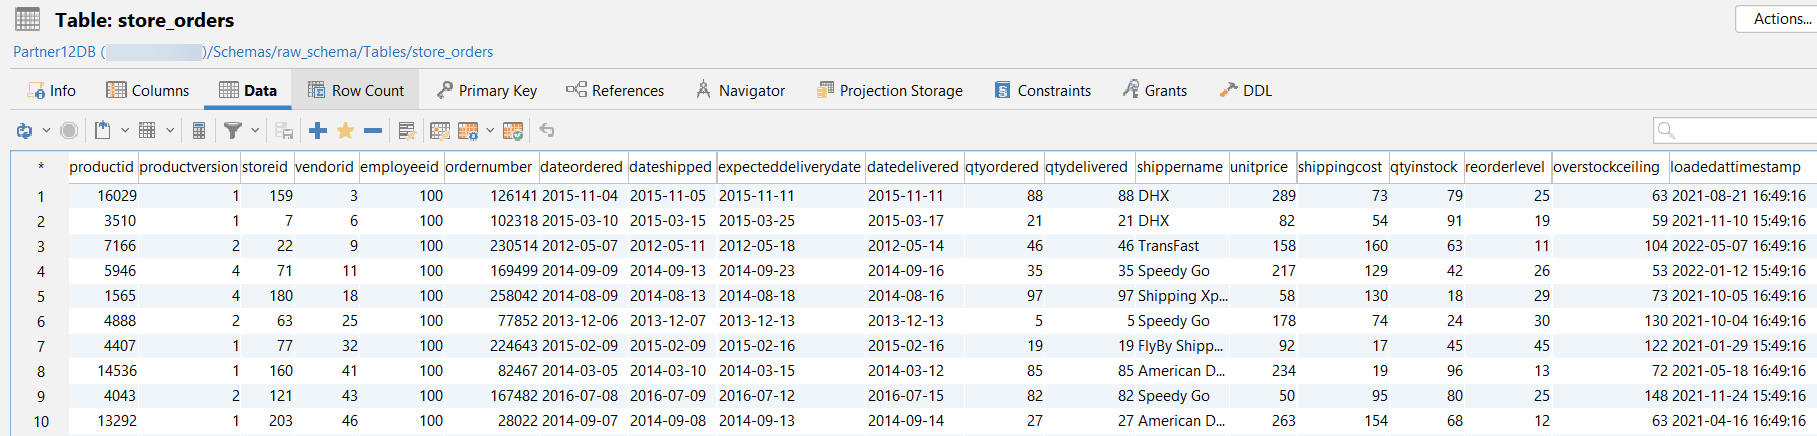
- name: store_orders
description: This is the raw store_orders data.
columns:
- name: ordernumber
description: The primary key for the raw store_orders data.
tests:
- unique
- not_null
以下是每个原始表的数据示例。图片仅显示前 10 行数据:
raw_schema.states:
raw_schema.vendors:

raw_schema.store_orders:
创建模型
dbt 模型是我们为了转换数据而在 SQL 文件中编写的 select 语句。
Staging 模型
以下 staging 模型标准化了原始表中的列名,位于 models > staging > vmart 目录中。
说明: 这些模型以视图(view)的形式构建。
models > staging > vmart > stg_vendors.sql
该模型创建了 dbt_schema.stg_vendors 视图。它引用了原始数据表 vendors。
with source as (
  select * from {{ source('raw_data', 'vendors')
),

staged as (
  select
    vendorid as vendor_key,
    vendorname as vendor_name,
    vendoraddress as vendor_address,
    vendorcity as vendor_city,
    vendorstate as vendor_state,
    lastdealupdate as last_deal_update,
    loadedattimestamp as loaded_at_timestamp
  from source
)

select * from staged
models > staging > vmart > stg_states.sql
该模型创建了 dbt_schema.stg_states 视图。它引用了原始数据表 states。
with source as (
  select * from {{ source('raw_data', 'states')
),

staged as (
  select
    statename as state_name,
    statecode as state_code,
    region,
    division
  from source
)

select * from staged
models > staging > vmart > stg_store_orders.sql
该模型创建了 dbt_schema.stg_store_orders 视图。它引用了原始数据表 store_orders。
with source as (
  select * from {{ source('raw_data', 'store_orders')
),

staged as (
  select
    productid as product_key,
    productversion as product_version,
    storeid as store_key,
    vendorid as vendor_key,
    employeeid as employee_key,
    ordernumber as order_number,
    dateordered as date_ordered,
    dateshipped as date_shipped,
    expecteddeliverydate as expected_delivery_date,
    datedelivered as date_delivered,
    qtyordered as quantity_ordered,
    qtydelivered as quantity_delivered,
    shippername as shipper_name,
    unitprice as unit_price,
    shippingcost as shipping_cost,
    qtyinstock as quantity_in_stock,
    reorderlevel as reorder_level,
    overstockceiling as overstock_ceiling,
    loadedattimestamp as loaded_at_timestamp
  from source
)

select * from staged
Marts 模型
以下 marts 模型应用业务逻辑来转换 staging 模型中的数据。它们位于 models > marts 目录中。
说明: 这些模型以表(table)的形式构建。
models > marts > dim_vendors.sql
该模型创建了维度表 dbt_schema.dim_vendors。它引用了 staging 表 dbt_schema.stg_vendors 和 dbt_schema.stg_states,并通过连接 staging 表将 vendor_region 列引入到 dim_vendors 表中。
{{ config (
  materialized = 'table'
  )
}}

with vendors as (
  select * from {{ ref('stg_vendors')
),

states as (
  select * from {{ ref('stg_states')
),

joined as (
  select
    vendor_key,
    vendor_name,
    vendor_address,
    vendor_city,
    vendor_state,
    states.region as vendor_region,
    last_deal_update,
    loaded_at_timestamp
  from
    vendors inner join states on
    vendors.vendor_state = states.state_code
),

final as (
  select * from joined
)

select * from final
models > marts > fct_store_orders.sql
该模型创建了事实表 dbt_schema.fct_store_orders。它引用了 staging 表 dbt_schema.stg_store_orders,并应用业务逻辑来计算以下指标:

它还根据 date_ordered 列按年份对数据进行分区。Vertica 为每个唯一的 date_ordered 年份创建一个分区键。
说明: 在 Vertica 数据库中对大型事实表进行分区是提高查询性能的良好实践。
/*
 创建表 fct_store_orders 并按订单日期年份分区数据
 Vertica 为每个唯一的 date_ordered 年份创建一个分区键。
*/
{{ config(
  materialized = 'table',
  partition_by_string = 'YEAR(date_ordered)'
  )
}}

with store_orders as (
  select * from {{ ref('stg_store_orders')
),

fact as (
  select
    product_key,
    product_version,
    store_key,
    vendor_key,
    employee_key,
    order_number,
    date_ordered,
    date_shipped,
    expected_delivery_date,
    date_delivered,
    (date_delivered - date_ordered) as days_to_deliver,
    quantity_ordered,
    quantity_delivered,
    shipper_name,
    unit_price,
    shipping_cost,
    ((quantity_delivered * unit_price) + shipping_cost) as total_order_cost,
    quantity_in_stock,
    reorder_level,
    overstock_ceiling,
    loaded_at_timestamp,
    1 as order_count,
    case when (quantity_delivered = quantity_ordered)
    then 1 else 0 end as quantity_accuracy_flag,
    case when (date_delivered <= expected_delivery_date)
    then 1 else 0 end as on_time_delivery_flag,
    case when (quantity_delivered = quantity_ordered) and
    (date_delivered <= expected_delivery_date)
    then 1 else 0 end as perfect_order_flag
  from
    store_orders
),

final as (
  select * from fact
)

select * from final
Report 模型
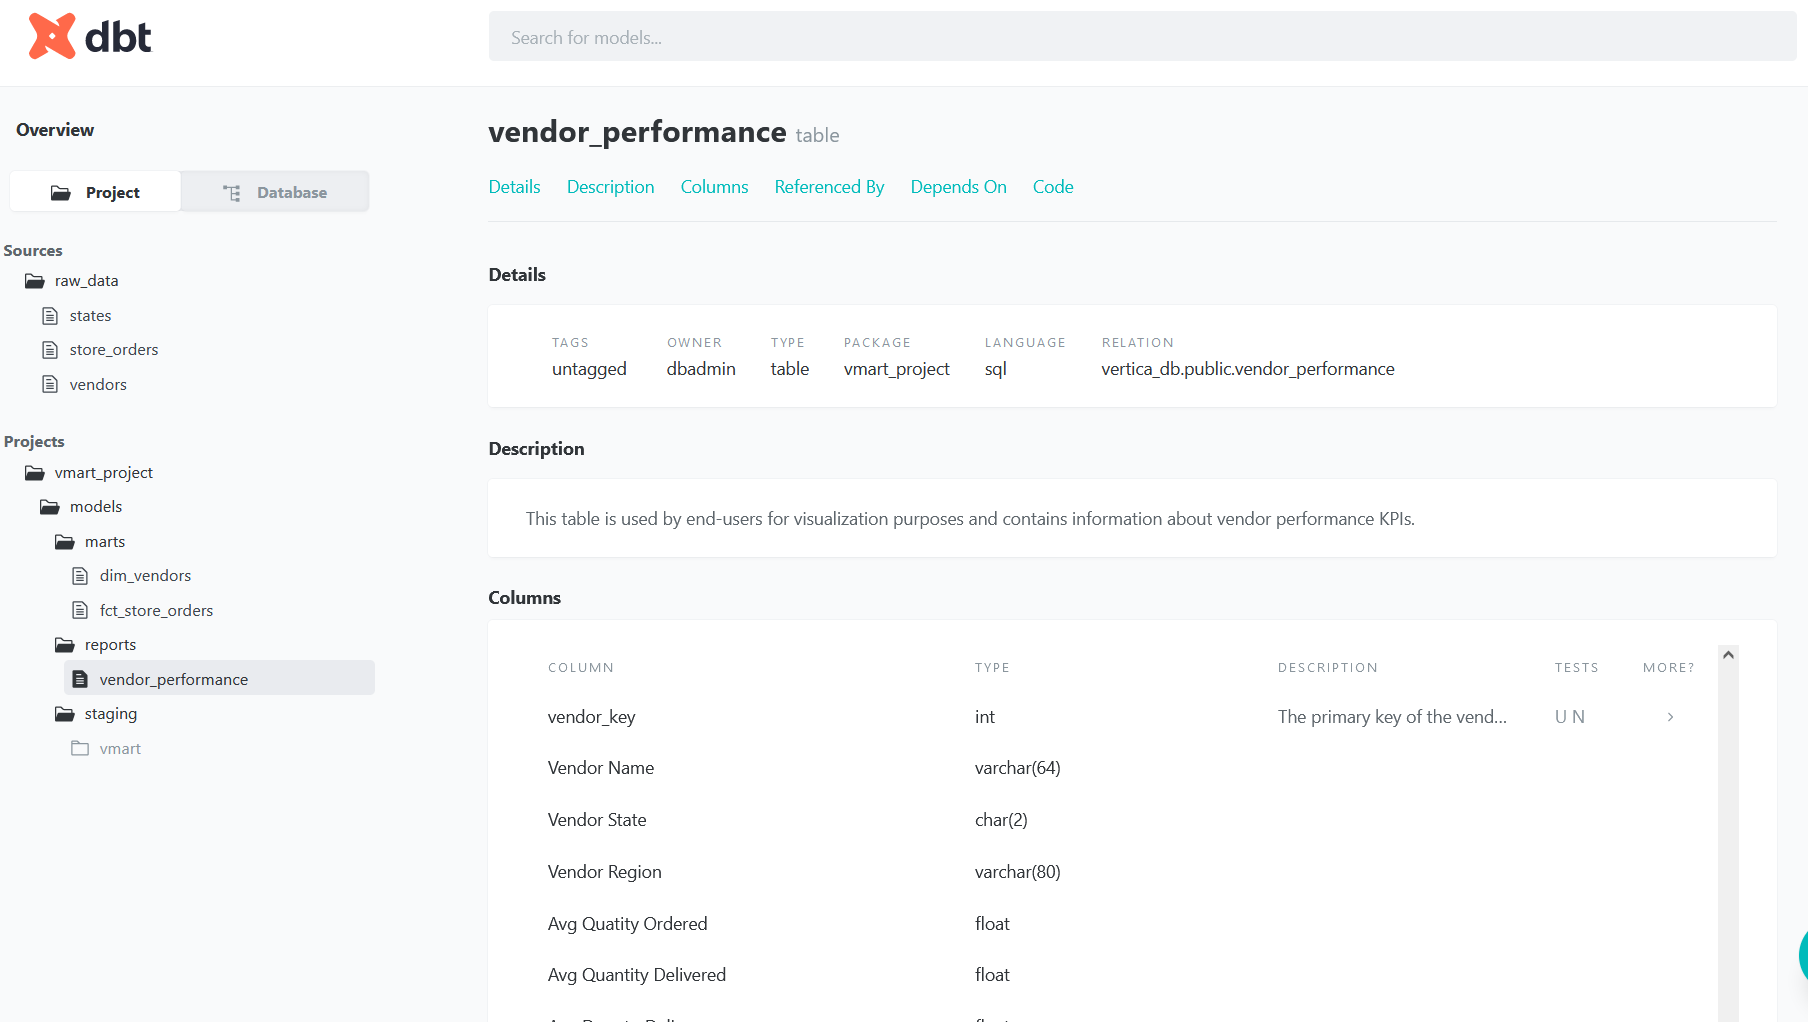
管道中的最终模型称为 vendor_performance,位于 models > reports 目录中。该模型创建了报表表 dbt_schema.vendor_performance。它引用了事实表 dbt_schema.fct_store_orders 和维度表 dbt_schema.dim_vendors,并应用业务逻辑来计算以下指标:

此外,表和投影数据按哈希值分段,并按 vendor_key 列排序。
说明: 此模型以表的形式构建。
models > reports > vendor_performance.sql
/*
 表和投影数据按 vendor_key 列进行哈希分段,
 并在同一列上排序。
 数据均匀分布到所有集群节点。
*/
{{ config(
  materialized = 'table',
  order_by = 'vendor_key',
  segmented_by_string = 'vendor_key'
  )
}}

with vendors as (
  select * from {{ ref('dim_vendors')
),

store_orders as (
  select * from {{ ref('fct_store_orders')
),

joined as (
  select
    store_orders.vendor_key as "vendor_key",
    vendors.vendor_name as "Vendor Name",
    vendors.vendor_state as "Vendor State",
    vendors.vendor_region as "Vendor Region",
    avg(quantity_ordered) as "Avg Quantity Ordered",
    avg(quantity_delivered) as "Avg Quantity Delivered",
    avg(days_to_deliver) as "Avg Days to Deliver",
    avg(shipping_cost) as "Avg Shipping Cost",
    avg(total_order_cost) as "Avg Order Cost",
    sum(quantity_accuracy_flag) / count(order_count) as "Quantity Accuracy Rate",
    sum(on_time_delivery_flag) / count(order_count) as "On-time Delivery Rate",
    sum(perfect_order_flag) / count(order_count) as "Perfect Order Rate"
  from
    store_orders inner join vendors on
    vendors.vendor_key = store_orders.vendor_key
  group by
    1, 2, 3, 4
),

final as (
  select * from joined
)

select * from final
转换为增量模型
我们在上一节中创建的模型在需要时可以转换为增量模型。增量模型仅处理新增或更新的数据,而不是在每次运行时重建整个表。增量模型比表物化(table materialization)性能更好,特别是在处理大型表时。
我们在 models > staging > vmart 目录中额外创建了两个模型:stg_store_orders_merge.sql 和 stg_store_orders_insert_overwrite.sql。这些模型使用到达原始表 store_orders 的新数据来增量更新 store_orders 信息。
使用 Merge 策略转换为增量模型
此模型使用增量策略 merge,并创建表 dbt_schema.stg_store_orders_merge。
在此示例中:
- 目标表为
dbt_schema.stg_store_orders_merge,源表为raw_schema.store_orders。 - 它使用主键
order_number将源表store_orders中新增或更改的行与目标表stg_store_orders_merge中的行进行匹配。 - 它使用
merge_update_columns配置参数指定我们关心更新的列。这些列是date_delivered、quantity_delivered和shipping_cost。 - 我们希望更新自上次运行模型以来所有新增或更改的行;此条件在
where子句中指定。
models > staging > vmart > stg_store_orders_merge.sql
{{ config(
  materialized = 'incremental',
  incremental_strategy = 'merge',
  unique_key = 'order_number',
  merge_update_columns = ['date_delivered', 'quantity_delivered', 'shipping_cost']
  )
}}

with new_store_orders as (
  select * from {{ source('raw_data', 'store_orders')
  {% if is_incremental() %}
  where loadedattimestamp >= ( select max(loaded_at_timestamp) from {{this}} )
  {% endif %}
),

updated_store_orders as (
  select
    productid as product_key,
    productversion as product_version,
    storeid as store_key,
    vendorid as vendor_key,
    employeeid as employee_key,
    ordernumber as order_number,
    dateordered as date_ordered,
    dateshipped as date_shipped,
    expecteddeliverydate as expected_delivery_date,
    datedelivered as date_delivered,
    qtyordered as quantity_ordered,
    qtydelivered as quantity_delivered,
    shippername as shipper_name,
    unitprice as unit_price,
    shippingcost as shipping_cost,
    qtyinstock as quantity_in_stock,
    reorderlevel as reorder_level,
    overstockceiling as overstock_ceiling,
    loadedattimestamp as loaded_at_timestamp
  from new_store_orders
)

select * from updated_store_orders
底层原理:
以下是 dbt 执行并在 Vertica 中运行的一系列步骤:
- 比较目标表与源表,选择自上次运行模型以来列值发生更改或新增的所有行。dbt 创建一个临时表,其中包含将要更新或插入的行。
- 执行一个 merge 语句,使用主键
order_number在行存在时更新,或在行不存在时插入。
MERGE
INTO
  "partner12db"."dbt_schema"."stg_store_orders_merge" AS DBT_INTERNAL_DEST
USING
  "stg_store_orders_merge__dbt_tmp" AS DBT_INTERNAL_SOURCE
ON
  DBT_INTERNAL_DEST."order_number" = DBT_INTERNAL_SOURCE."order_number"
WHEN MATCHED
  THEN
UPDATE
SET
  "date_delivered" = DBT_INTERNAL_SOURCE."date_delivered",
  "quantity_delivered" = DBT_INTERNAL_SOURCE."quantity_delivered",
  "shipping_cost" = DBT_INTERNAL_SOURCE."shipping_cost"
WHEN NOT MATCHED
  THEN
INSERT
  (
    "product_key",
    "product_version",
    "store_key",
    "vendor_key",
    "employee_key",
    "order_number",
    "date_ordered",
    "date_shipped",
    "expected_delivery_date",
    "date_delivered",
    "quantity_ordered",
    "quantity_delivered",
    "shipper_name",
    "unit_price",
    "shipping_cost",
    "quantity_in_stock",
    "reorder_level",
    "overstock_ceiling",
    "loaded_at_timestamp"
  )
VALUES
  (
    DBT_INTERNAL_SOURCE."product_key",
    DBT_INTERNAL_SOURCE."product_version",
    DBT_INTERNAL_SOURCE."store_key",
    DBT_INTERNAL_SOURCE."vendor_key",
    DBT_INTERNAL_SOURCE."employee_key",
    DBT_INTERNAL_SOURCE."order_number",
    DBT_INTERNAL_SOURCE."date_ordered",
    DBT_INTERNAL_SOURCE."date_shipped",
    DBT_INTERNAL_SOURCE."expected_delivery_date",
    DBT_INTERNAL_SOURCE."date_delivered",
    DBT_INTERNAL_SOURCE."quantity_ordered",
    DBT_INTERNAL_SOURCE."quantity_delivered",
    DBT_INTERNAL_SOURCE."shipper_name",
    DBT_INTERNAL_SOURCE."unit_price",
    DBT_INTERNAL_SOURCE."shipping_cost",
    DBT_INTERNAL_SOURCE."quantity_in_stock",
    DBT_INTERNAL_SOURCE."reorder_level",
    DBT_INTERNAL_SOURCE."overstock_ceiling",
    DBT_INTERNAL_SOURCE."loaded_at_timestamp"
  )
使用 insert_overwrite 策略转换为增量模型
此模型使用增量策略 insert_overwrite,并创建表 dbt_schema.stg_store_orders_insert_overwrite。
insert_overwrite 策略基于分区删除并插入目标表中的行。partition_by_string 配置参数是一个用于将目标表划分为分区的表达式。partitions 配置参数指定将从目标表中删除并从源表中插入的分区。
在此示例中:
- 目标表为
dbt_schema.stg_store_orders_insert_overwrite,源表为raw_schema.store_orders。 - 目标表按
date_ordered列分为年度分区。 partitions配置参数中指定的分区与where子句中指定的分区相同。- 假设当前年份为 2023,我们希望替换 2023 和 2022 年的分区。
重要说明:
partitions配置参数是可选的。如果在where子句之外还指定了partitions配置参数,可能会出现以下两种情况: - 目标表最终可能会缺少源表中的某些分区。如果partitions配置参数中指定的某些分区未在where子句中指定,就会出现这种情况。目标表中所有在partitions配置参数中指定的分区都将被删除,但并非所有分区都会从源表中重新插入。 - 目标表最终可能会出现重复行。如果where子句中指定的某些分区未在partitions配置参数中指定,就会出现这种情况。配置参数中的所有分区都将从目标表中删除,但where子句中指定的源表中的额外分区将被插入到目标表中。
models > staging > vmart > stg_store_orders_insert_overwrite.sql
{{ config(
  materialized = 'incremental',
  incremental_strategy = 'insert_overwrite',
  partition_by_string = 'year(date_ordered)',
  partitions = ['2022', '2023']
  )
}}

with new_store_orders as (
  select * from {{ source('raw_data', 'store_orders')
  {% if is_incremental() %}
  where YEAR(dateordered) >= YEAR(now())-1
  {% endif %}
),

updated_store_orders as (
  select
    productid as product_key,
    productversion as product_version,
    storeid as store_key,
    vendorid as vendor_key,
    employeeid as employee_key,
    ordernumber as order_number,
    dateordered as date_ordered,
    dateshipped as date_shipped,
    expecteddeliverydate as expected_delivery_date,
    datedelivered as date_delivered,
    qtyordered as quantity_ordered,
    qtydelivered as quantity_delivered,
    shippername as shipper_name,
    unitprice as unit_price,
    shippingcost as shipping_cost,
    qtyinstock as quantity_in_stock,
    reorderlevel as reorder_level,
    overstockceiling as overstock_ceiling,
    loadedattimestamp as loaded_at_timestamp
  from new_store_orders
)

select * from updated_store_orders
底层原理:
模型首次运行时,表会根据配置参数 partition_by_string 中指定的表达式进行分区。在此示例中,目标表 dbt_schema.stg_store_orders_insert_overwrite 使用源表 raw_schema.store_orders 中的数据创建,并根据 date_ordered 列按年份分区。
模型首次运行时执行的 DDL:
create table
  "partner12db"."dbt_schema"."stg_store_orders_insert_overwrite"
INCLUDE SCHEMA PRIVILEGES as (
  with new_store_orders as (
    select * from "partner12db"."raw_schema"."store_orders"
  ),
  updated_store_orders as (
    select
      productid as product_key,
      productversion as product_version,
      storeid as store_key,
      vendorid as vendor_key,
      employeeid as employee_key,
      ordernumber as order_number,
      dateordered as date_ordered,
      dateshipped as date_shipped,
      expecteddeliverydate as expected_delivery_date,
      datedelivered as date_delivered,
      qtyordered as quantity_ordered,
      qtydelivered as quantity_delivered,
      shippername as shipper_name,
      unitprice as unit_price,
      shippingcost as shipping_cost,
      qtyinstock as quantity_in_stock,
      reorderlevel as reorder_level,
      overstockceiling as overstock_ceiling
    from new_store_orders
  )
  select * from updated_store_orders
);
alter table "partner12db"."dbt_schema"."stg_store_orders_insert_overwrite" partition by year(date_ordered);
在后续运行中:
- dbt 使用
DROP_PARTITIONS语句删除目标表中where子句指定的每个分区的所有行。在此示例中,分区对应于ordered_date中年份大于等于当前年份减 1 的所有年份。这意味着如果当前年份是 2023,则要删除的分区是 2023 和 2022。 - dbt 使用
INSERT语句将选定的行从源表插入到目标表。从源表选定的行是对应于where子句中指定分区的行。在此示例中,插入到目标表中的行是 2023 和 2022 年份的行。
以下是后续运行执行的 DDL 和 DML:
SELECT PARTITION_TABLE('dbt_schema.stg_store_orders_insert_overwrite');

SELECT DROP_PARTITIONS('dbt_schema.stg_store_orders_insert_overwrite', '2022', '2022');
SELECT PURGE_PARTITION('dbt_schema.stg_store_orders_insert_overwrite', '2022');

SELECT DROP_PARTITIONS('dbt_schema.stg_store_orders_insert_overwrite', '2023', '2023');
SELECT PURGE_PARTITION('dbt_schema.stg_store_orders_insert_overwrite', '2023');

INSERT INTO "partner12db"."dbt_schema"."stg_store_orders_insert_overwrite"
  ("product_key", "product_version", "store_key",
   "vendor_key", "employee_key", "order_number",
   "date_ordered", "date_shipped", "expected_delivery_date",
   "date_delivered", "quantity_ordered", "quantity_delivered",
   "shipper_name", "unit_price", "shipping_cost", "quantity_in_stock",
   "reorder_level", "overstock_ceiling", "loaded_at_timestamp")
(
  SELECT "product_key", "product_version", "store_key",
         "vendor_key", "employee_key", "order_number", "date_ordered",
         "date_shipped", "expected_delivery_date", "date_delivered",
         "quantity_ordered", "quantity_delivered", "shipper_name",
         "unit_price", "shipping_cost", "quantity_in_stock",
         "reorder_level", "overstock_ceiling", "loaded_at_timestamp"
  FROM "stg_store_orders_insert_overwrite__dbt_tmp"
);
模型的文档和测试
模型的文档和测试在以下 .yml 文件中指定:
models > staging > vmart > stg_vmart.yml
此文件描述了 staging 模型并测试了主键。
version: 2

models:
  - name: stg_states
    description: This is the staged states table.
    columns:
      - name: state_code
        description: The primary key of the stg_states table.
        tests:
          - not_null
          - unique

  - name: stg_vendors
    description: This is the staged vendors table.
    columns:
      - name: vendor_key
        description: The primary key of the stg_vendors table.
        tests:
          - not_null
          - unique

  - name: stg_store_orders
    description: This is the staged store_orders table.
    columns:
      - name: order_number
        description: The primary key of the stg_store_orders table.
        tests:
          - not_null
          - unique
models > marts > marts.yml
此文件描述了 marts 模型中的指标并测试了主键。
version: 2

models:
  - name: dim_vendors
    description: "This is the vendors dimension table."
    columns:
      - name: vendor_key
        description: The primary key of the vendors dimension table.
        tests:
          - not_null
          - unique

  - name: fct_store_orders
    description: "This is the store orders fact table."
    columns:
      - name: order_number
        description: The primary key of the store orders fact table.
        tests:
          - not_null
          - unique

      - name: days_to_deliver
        description: "Number of days it takes to deliver an order. This is the date of delivery minus the date of the order. Example: days_to_deliver = (date_delivered - date_ordered)"

      - name: total_order_cost
        description: "Total cost of a particular order. This is quantity delivered multiplied by the unit price plus the cost of shipping. Example: total_order_cost = (qtydelivered * unitprice) + shippingcost"

      - name: order_count
        description: "Order count has the value of 1. This column facilitates the calculation of different measures for reporting such as quantity_accuracy_rate and on_time_delivery_rate."

      - name: quantity_accuracy_flag
        description: "The quantity accuracy flag indicates whether the order was delivered with the correct quantity. This is the quantity_delivered field equaling the quantity_ordered field. An example of this calculation is: IF (quantity_delivered = quantity_ordered) THEN (1) ELSE (0) END."

      - name: on_time_delivery_flag
        description: "The on-time delivery flag indicates whether the order was delivered on the expected delivery date or sooner. This is the date_delivered is less than or equal to the expected_delivery_date. An example of this calculation is: IF (date_delivered <= expected_delivery_date) THEN (1) ELSE (0) END."

      - name: perfect_order_flag
        description: "The perfect order flag indicates whether the order was delivered without incidents. This is both quantity accuracy and on-time delivery. An example of this calculation is: IF (date_delivered <= expected_delivery_date) AND (quantity_delivered = quantity_ordered) THEN (1) ELSE (0) END."
models > reports > reports.yml
此文件描述了 reports 模型中的指标并测试了主键。
version: 2

models:
  - name: vendor_performance
    description: "This table is used by end-users for visualization purposes and contains information about vendor performance KPIs."
    columns:
      - name: vendor_key
        description: The primary key of the vendor_performance table.
        tests:
          - not_null
          - unique

      - name: quantity_accuracy_rate
        description: "The quantity accuracy rate is the percentage of orders that were delivered with the correct quantity. quantity_accuracy_rate = TOTAL(quantity_accuracy_flag) / TOTAL(order_count)"

      - name: on_time_delivery_rate
        description: "The on-time delivery rate is the percentage of orders that were delivered on the expected delivery date or sooner. on_time_delivery_rate = TOTAL(on_time_delivery_flag) / TOTAL(order_count)"

      - name: perfect_order_rate
        description: "The perfect order rate is the percentage of orders that were delivered without incidents. perfect_order_rate = TOTAL(perfect_order_flag) / TOTAL(order_count)"
运行与测试解决方案
要构建该解决方案,请执行 dbt build 命令。此命令将运行并测试所有上游模型,包括最后一个模型。它还会对 src_vmart.yml 中指定的源数据执行测试。
生成文档和 Lineage 图
要生成 Lineage 图并查看项目管道的依赖关系,请执行:
然后执行:
在文档网站中,单击 DAG 图标:

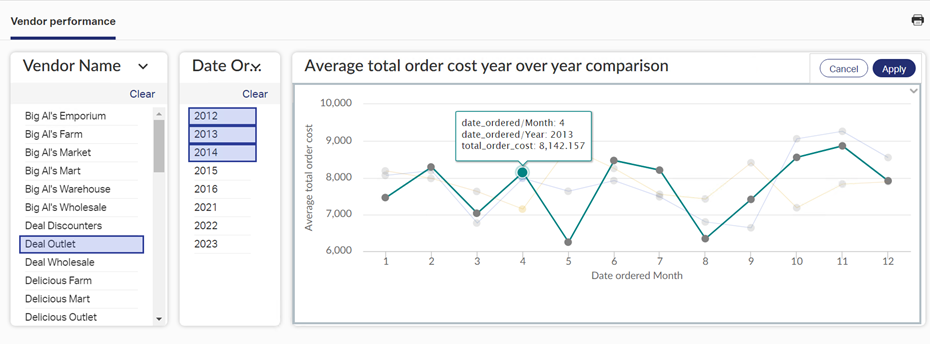
可视化转换后的数据
您可以使用任何偏好的工具连接到 Vertica 并可视化 dbt 生成的表数据。在此示例中,我们使用了 OpenText 的 Magellan 创建了一个供应商绩效仪表板:
总结与结论
我们创建了一个全面的数据转换管道示例,该示例使用业务逻辑将原始数据转换为维度表和事实表,用于业务分析和报表。
Vertica + dbt 构成了一个强大的数据库内数据转换解决方案,充分利用了您数据库的速度优势。